How to do Netcore Email API DNS settings with Godaddy?
With Godaddy, registering domains is incredibly fast, simple and affordable. Netcore Email API’s integration with Godaddy gives you a winning edge. Learn on how to configure Netcore Email API DNS settings with GoDaddy. SPF, DKIM, CNAME Setup for GoDaddy.
SPF, DKIM, CNAME Setup for GoDaddy
Did you know: It takes only 5 mins to configure Netcore Email API DNS settings!!! Let’s get started.
Step 1:
Add Sender Domain in Netcore Email API Dashboard.
Step 2:
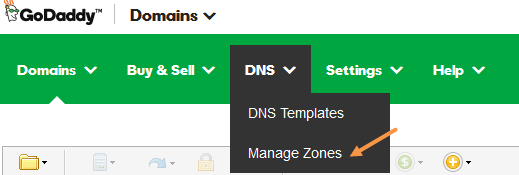
Log in to GoDaddy. Go to “DNS” tab.

Step 3:
Goto “Manage Zones” from the DNS menu.

Step 4:
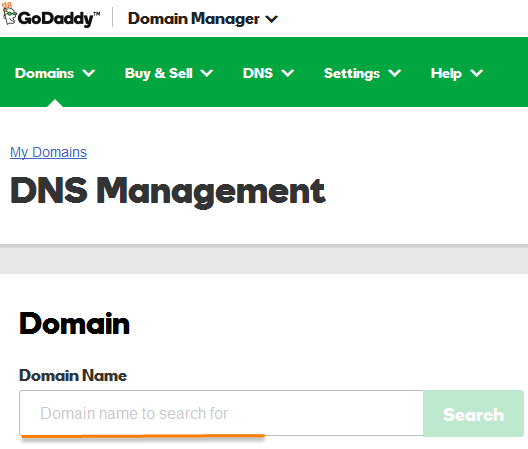
A new screen will appear as given below. Type your domain name in the search box and hit Search button.

Step 5:
To configure SPF record, click on Add button to add a new record or click on Edit button in case there is already an existing record with a value beginning with 'v=spf1'.

Step 6:
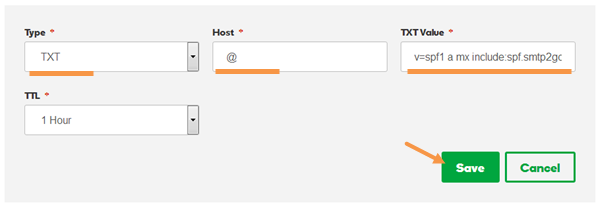
Select the TXT option from the Type drop-down menu.
Enter @ into the Host field.
Enter the SPF record what is given in your Netcore Email API dashboard. We recommend to Copy the exact value and paste in this field.
If your domain name already has a SPF record then refer to below example :
For example, if your SPF record currently looks like this: v=spf1 x mx ~all
You should change it to this: v=spf1 x mx include:6033423b.ppspf.net ~all
*Content highlighted above in the record will vary for account. So refer to your Netcore Email API dashboard to know the exact value.

Step 7:
In order to create a DKIM record, click the ADD button.
Enter pepipost._domainkey. into the Host field.
Enter TXT value what is given in your Netcore Email API dashboard. We recommend to Copy the exact value and paste in this fi
eld.


Step 8:
Setup CNAME record.
Select the CNAME option from the Type drop-down menu.
Enter the Host as recommended on Netcore Email API dashboard.
Enter the Points to value as recommended on Netcore Email API dashboard, then click the Save button.

Related Resources
How to add and verify domain?
How to send emails in WordPress using SMTP?
Updated almost 5 years ago
