Sender Email ID Authentication
Overview
The Authorized Sender Email ID feature in Netcore CPaaS Email helps protect your email sending by making sure only approved sender addresses can be used. Without this, anyone with an API key could send emails from any address, like pretending to be [email protected], which can lead to phishing or spoofing attacks. This feature adds a security layer by letting you control and verify which email addresses can send emails through the API.
Prerequisites
Ensure the following prerequisites are fulfilled to enable the Email Authentication
- Access to the Netcore CPaaS panel.
- Account with Admin privileges.
Roles & Permission
The table below summarizes the roles and permissions for Email Authentication.
| Role | Add Email IDs | Enable/Disable Sender Auth | Verify Email IDs |
|---|---|---|---|
| Admin | Yes | Yes | Yes |
| Technical Team | Yes | Yes | No |
| Analytics | Yes | Yes | No |
| Marketing | Yes | No | No |
How to Configure Email Authentication
To configure the Email Authentication, follow the steps below
- Login to the Netcore CPaaS dashboard with an account which has Admin privilages.
Note
Non-Admin users cannot configure the settings on the panel.

Verify Email ID for Authentication
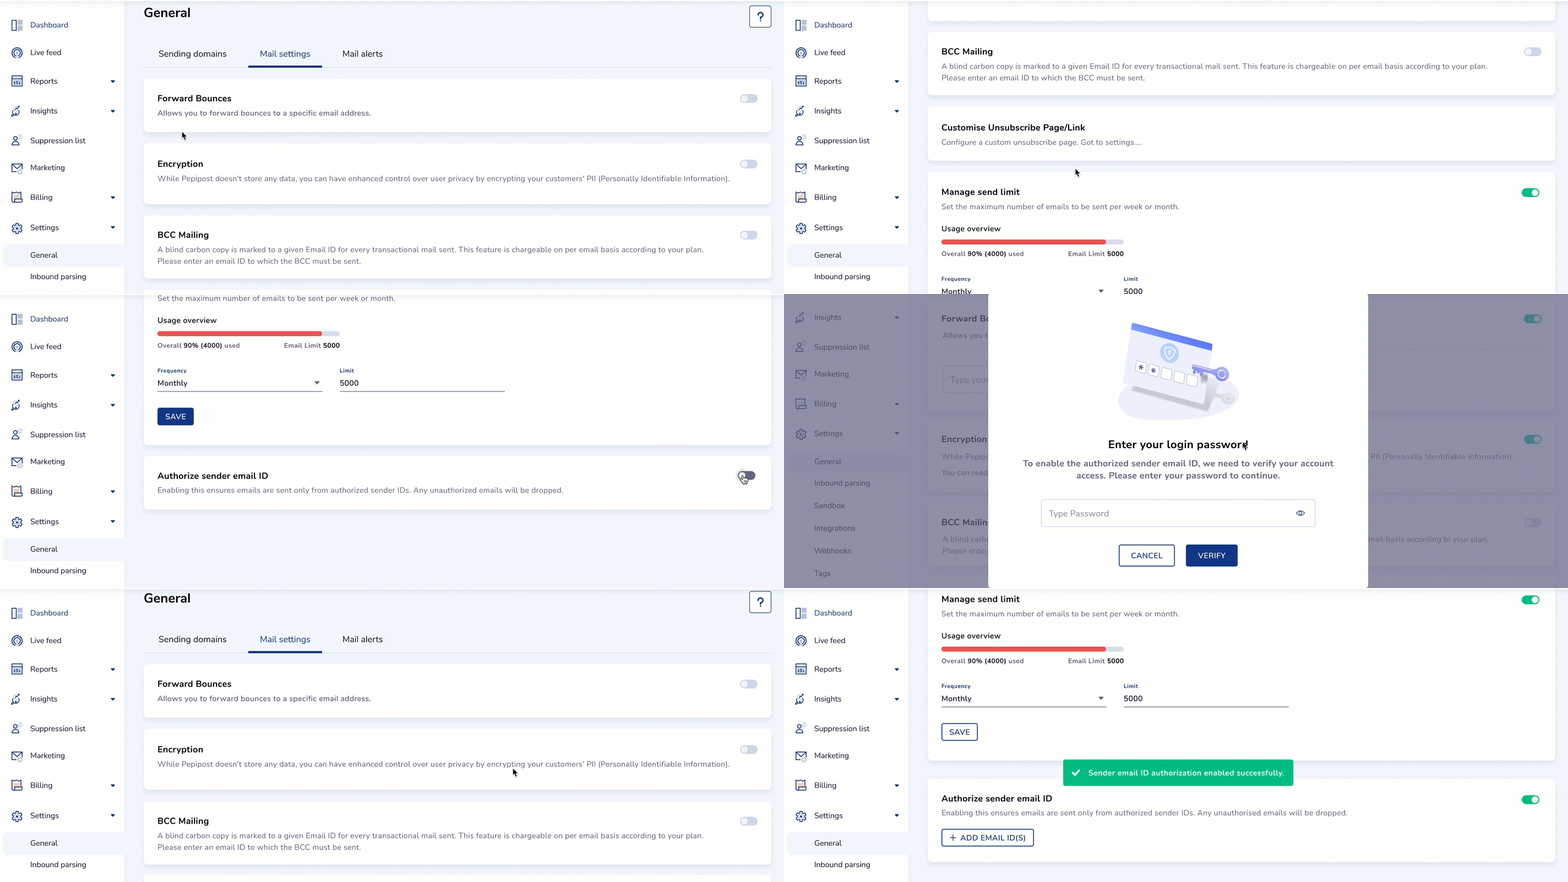
- Navigate to Settings > General > Mail Settings. Scroll down to Authorized sender email ID.
- Toggle on Authorized sender email ID and enter your login password to proceed.
Important
- All outgoing email traffic will be dropped when the feature is enabled and no authorized sender email addresses are configured.
- It is recommended to plan a scheduled downtime of 15–30 minutes to add and verify sender email addresses. You should resume email operations only after setting up the email authentication.
- Add one or more sender email addresses in the configuration screen and click Save.
The email addresses entered for configuration will enter the Verification Pending status. A verification email is sent to the Admin, including a Verify All Emails option. If all added sender emails are acceptable, the Admin can click Verify All Emails from the email.
If the Admin doesn't want to approve all the added sender email IDs, they can choose to verify only specific ones. To do this
- Log in to the Netcore CPaaS Email Dashboard.
- Navigate to Settings > General > Mail Settings, and click the Verify button next to the email addresses you want to approve.
Note
Once verified, the email addresses enter Verified status, and email sending is permitted.
- Besides sender email verification, the sending domain must be validated and listed under Approved Sending Domains. Domains in the verification pending state cannot be used. Refer here for the Domain Verification document
Only sender emails from active and verified domains are allowed.
Updated about 1 month ago
